> ## Documentation Index
> Fetch the complete documentation index at: https://data.birdeye.so/docs/llms.txt
> Use this file to discover all available pages before exploring further.
# Birdeye MCP
> Connect Claude, Cursor, and other AI tools to Birdeye Data through the Model Context Protocol
Birdeye MCP Server is currently in Beta. It is under active development, so tool names, response shapes, and rate limits may change. Share feedback through [bds.support@birdeye.so](mailto:bds.support@birdeye.so).
The official Birdeye MCP Server makes Birdeye data available to your AI models and applications. This page walks through setup: getting your API key, picking a server, and connecting your client of choice.
## Prerequisites
Node.js 18 or higher is required if you are using Claude Desktop. Download it from [nodejs.org](https://nodejs.org/en/download).
1. Log in to [bds.birdeye.so](https://bds.birdeye.so)
2. Go to **Usages** then **Security**
3. Click **Generate Authentication key** and copy the API key
Prefer to watch instead of read? Here's a short walkthrough of the whole setup, from getting your API key to connecting Claude:
With your API key in hand, the next step is picking which server to connect to.
## Which server to use
| Server type | Best for | Endpoint |
| --------------------- | --------------------------------------------------------------------------------------------------------------------------------- | ---------------------------------------------- |
| Public, keyless | Quick testing, no account needed | `https://mcp.birdeye.so/mcp` |
| Remote, authenticated | Production apps and agent integrations. Unlocks every tool under your Demo or Pro plan, with higher and more reliable rate limits | `https://mcp.birdeye.so/mcp` with your API key |
Get an API key for the authenticated server at [bds.birdeye.so](https://bds.birdeye.so). Don't have one yet? Upgrade to Pro at [birdeye.so/data-api](https://birdeye.so/data-api).
### Public server (keyless)
The fastest way to get started. Add this to your client's MCP config file (for example `claude_desktop_config.json`):
```json theme={null}
{
"mcpServers": {
"birdeye-api-mcp": {
"command": "npx",
"args": [
"-y",
"mcp-remote@0.1.38",
"https://mcp.birdeye.so/mcp"
]
}
}
}
```
### Authenticated server
Add your API key to the same config:
```json theme={null}
{
"mcpServers": {
"birdeye-api-mcp": {
"command": "npx",
"args": [
"-y",
"mcp-remote@0.1.38",
"https://mcp.birdeye.so/mcp",
"--header",
"x-api-key:${API_KEY}"
],
"env": {
"API_KEY": ""
}
}
}
}
```
Paste your Birdeye API key when prompted to authorize the session and link your key to the MCP connection. The client also lets you toggle between dynamic and static tool sets; check the client UI for details if this matters for your setup.
Find your client's config file location at [modelcontextprotocol.io/quickstart](https://modelcontextprotocol.io/quickstart/user), since the file name and path differ by client.
## Connect with Claude
1. Locate `claude_desktop_config.json`. See the [MCP quickstart guide](https://modelcontextprotocol.io/quickstart/user) to find it on your system.
2. Add one of the server configs above.
3. Restart Claude Desktop for the change to take effect.
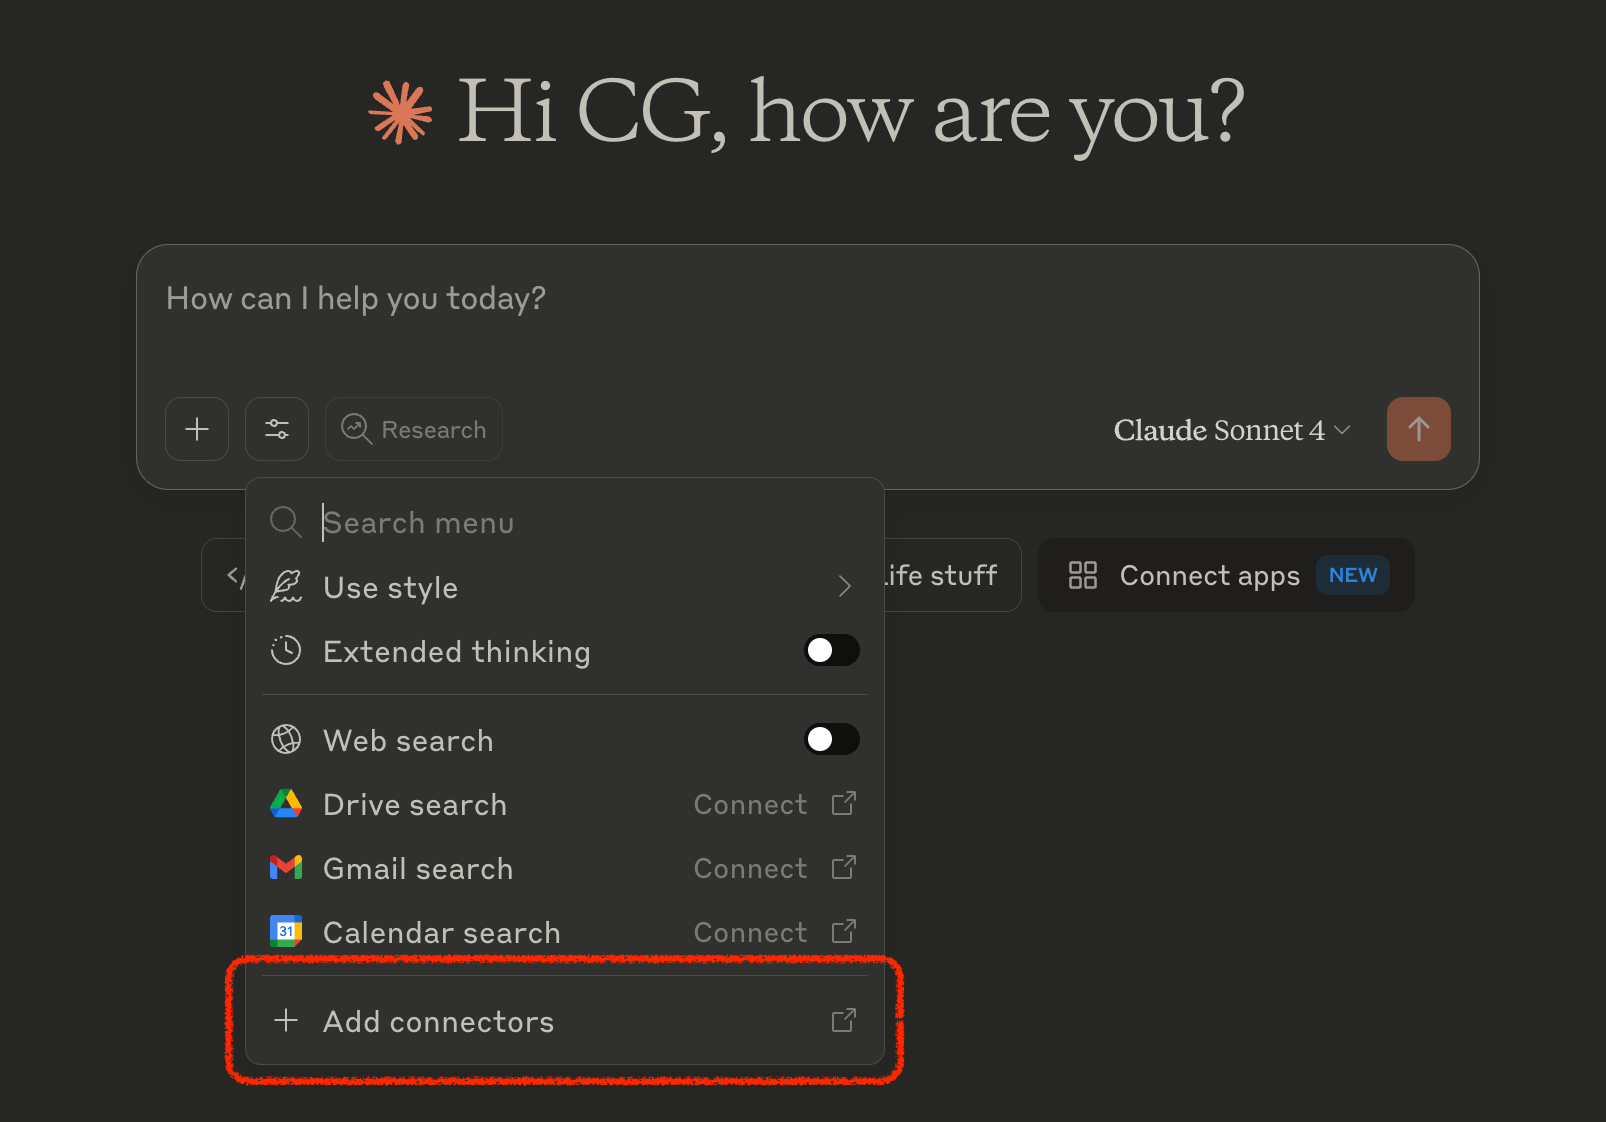
In Claude (claude.ai or the Desktop app), click **Add connectors** in the chat.
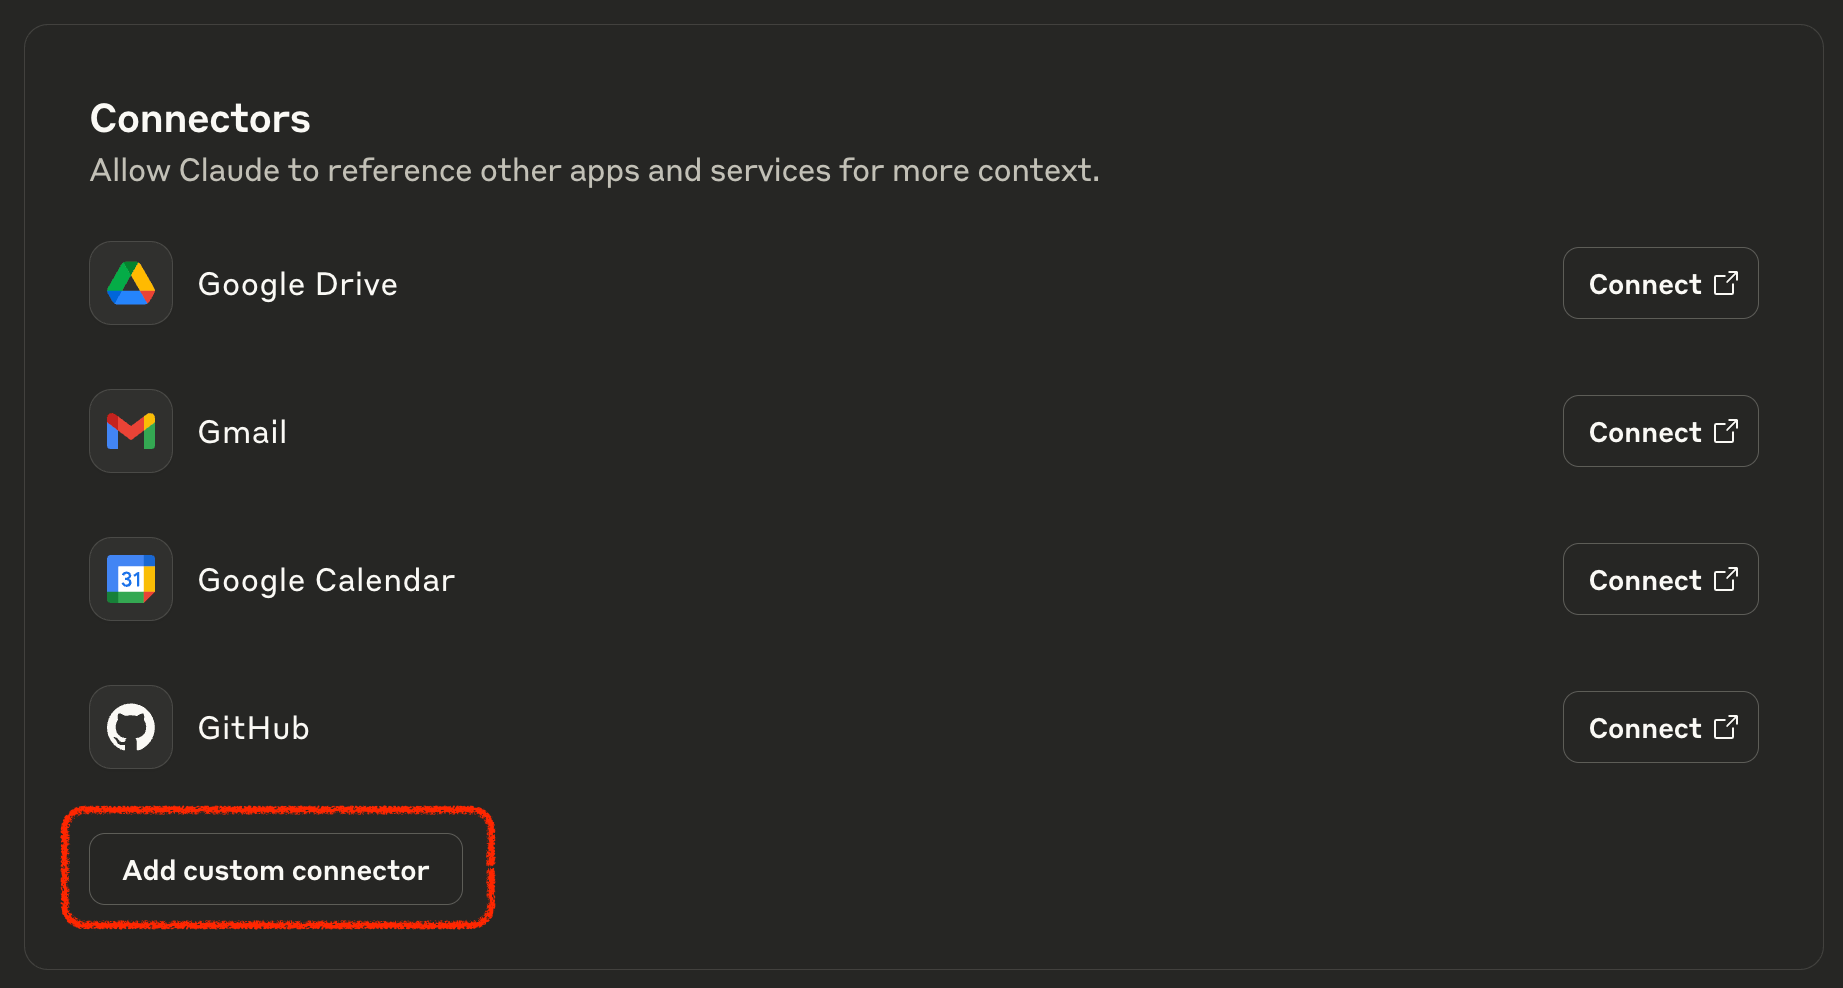
Click **Add custom connector**.
Paste `https://mcp.birdeye.so/mcp` and click **Add**.
Claude Pro users can also edit `claude_desktop_config.json` directly, using the same steps as Free users.
## Connect with other AI tools
Birdeye MCP works with any MCP compatible client. Each tab below shows the config for a specific tool; the server args are the same as the authenticated config above.
Add via the CLI:
```bash theme={null}
claude mcp add birdeye-mcp -- npx -y mcp-remote@0.1.38 https://mcp.birdeye.so/mcp --header "x-api-key:"
```
Or add directly to your project's `.mcp.json`:
```json theme={null}
{
"mcpServers": {
"birdeye-mcp": {
"command": "npx",
"args": ["-y", "mcp-remote@0.1.38", "https://mcp.birdeye.so/mcp", "--header", "x-api-key:${API_KEY}"],
"env": { "API_KEY": "" }
}
}
}
```
Add to `.cursor/mcp.json` (project level) or `~/.cursor/mcp.json` (global):
```json theme={null}
{
"mcpServers": {
"birdeye-mcp": {
"command": "npx",
"args": ["-y", "mcp-remote@0.1.38", "https://mcp.birdeye.so/mcp", "--header", "x-api-key:${API_KEY}"],
"env": { "API_KEY": "" }
}
}
}
```
Add to `~/.codeium/windsurf/mcp_config.json`:
```json theme={null}
{
"mcpServers": {
"birdeye-mcp": {
"command": "npx",
"args": ["-y", "mcp-remote@0.1.38", "https://mcp.birdeye.so/mcp", "--header", "x-api-key:${API_KEY}"],
"env": { "API_KEY": "" }
}
}
}
```
Add to `.vscode/mcp.json` in your project:
```json theme={null}
{
"inputs": [
{
"type": "promptString",
"id": "birdeye-api-key",
"description": "Enter your Birdeye API Key",
"password": true
}
],
"servers": {
"birdeye-mcp": {
"type": "stdio",
"command": "npx",
"args": ["-y", "mcp-remote@0.1.38", "https://mcp.birdeye.so/mcp", "--header", "x-api-key:${input:birdeye-api-key}"]
}
}
}
```
Add to `~/.gemini/settings.json`:
```json theme={null}
{
"mcpServers": {
"birdeye-mcp": {
"command": "npx",
"args": ["-y", "mcp-remote@0.1.38", "https://mcp.birdeye.so/mcp", "--header", "x-api-key:${BIRDEYE_API_KEY}"],
"env": { "BIRDEYE_API_KEY": "" }
}
}
}
```
Add to `~/.codex/config.toml`:
```toml theme={null}
[mcp_servers.birdeye-mcp]
command = "npx"
args = ["-y", "mcp-remote@0.1.38", "https://mcp.birdeye.so/mcp", "--header", "x-api-key:${BIRDEYE_API_KEY}"]
[mcp_servers.birdeye-mcp.env]
BIRDEYE_API_KEY = ""
```
Or use the CLI directly:
```bash theme={null}
codex mcp add birdeye-mcp -- npx -y mcp-remote@0.1.38 https://mcp.birdeye.so/mcp --header "x-api-key:"
```
Open VS Code Settings, navigate to **Cline > MCP Settings**, and add:
```json theme={null}
{
"mcpServers": {
"birdeye-mcp": {
"command": "npx",
"args": ["-y", "mcp-remote@0.1.38", "https://mcp.birdeye.so/mcp", "--header", "x-api-key:${API_KEY}"],
"env": { "API_KEY": "" }
}
}
}
```
Add to your project's `.roo/mcp.json`, or configure globally through Roo Code settings in VS Code:
```json theme={null}
{
"mcpServers": {
"birdeye-mcp": {
"command": "npx",
"args": ["-y", "mcp-remote@0.1.38", "https://mcp.birdeye.so/mcp", "--header", "x-api-key:${API_KEY}"],
"env": { "API_KEY": "" }
}
}
}
```
Add to `~/.aws/amazonq/mcp.json` (global) or `.amazonq/mcp.json` (workspace):
```json theme={null}
{
"mcpServers": {
"birdeye-mcp": {
"command": "npx",
"args": ["-y", "mcp-remote@0.1.38", "https://mcp.birdeye.so/mcp", "--header", "x-api-key:${API_KEY}"],
"env": { "API_KEY": "" }
}
}
}
```
Go to **Settings > Tools > AI Assistant > Model Context Protocol (MCP)** and add:
```json theme={null}
{
"mcpServers": {
"birdeye-mcp": {
"command": "npx",
"args": ["-y", "mcp-remote@0.1.38", "https://mcp.birdeye.so/mcp", "--header", "x-api-key:${API_KEY}"],
"env": { "API_KEY": "" }
}
}
}
```
Requires JetBrains IDE 2025.1+ with the MCP Server plugin, or 2025.2+ which has built in MCP support.
Add to `~/.continue/config.yaml`, or through the Continue settings UI:
```json theme={null}
{
"mcpServers": {
"birdeye-mcp": {
"command": "npx",
"args": ["-y", "mcp-remote@0.1.38", "https://mcp.birdeye.so/mcp", "--header", "x-api-key:${API_KEY}"],
"env": { "API_KEY": "" }
}
}
}
```
Open Zed settings and add to the `context_servers` section:
```json theme={null}
{
"context_servers": {
"birdeye-mcp": {
"command": {
"path": "npx",
"args": ["-y", "mcp-remote@0.1.38", "https://mcp.birdeye.so/mcp", "--header", "x-api-key:"]
}
}
}
}
```
Any other MCP compatible tool can connect using the same `command`, `args`, and header pattern shown above.
## Convert MCP into a skill (OpenClaw)
If your runtime is OpenClaw or Hermes rather than a standard MCP client, you can convert the Birdeye MCP server into a skill definition instead of connecting to it directly.
```bash theme={null}
node -v
npm -v
```
If these are missing, install with `sudo apt install -y nodejs npm` on Ubuntu or Debian, `brew install node` on macOS, or the installer from [nodejs.org](https://nodejs.org/) on Windows.
```bash theme={null}
npx @filiksyos/mcptoskill https://mcp.birdeye.so/mcp --header "x-api-key: " --name=birdeye
```
If prompted for a Bearer token, any placeholder value works. When asked to choose a target runtime, select either `openclaw` or `hermes`.
This generates a skill definition for the `birdeye` MCP server that your selected runtime can use directly.
## Next steps
See every endpoint exposed through Birdeye MCP, organized by task.
Skip the API key entirely and let your agent pay per request.